In any operation that depends on oxygen generators—whether for laser cutting, welding, or medical gas supply—system downtime is costly. Unexpected faults not only disrupt production but often lead to unnecessary service delays, missed deadlines, or equipment damage. This guide aims to demystify the most common issues users face with PSA oxygen systems and provide practical, step-by-step solutions that can be applied on-site by operators or technicians without the need for immediate third-party intervention.
The first question users usually ask when something goes wrong is: “What if it breaks?”, quickly followed by “Can I fix it myself?” These are valid concerns, especially in industries that rely on uninterrupted oxygen flow. Many failures stem from preventable causes—like moisture contamination, blocked filters, or faulty sensors—and can be diagnosed and fixed with basic tools and a bit of structured knowledge.
In the following sections, we’ll walk you through a full range of real-world faults—from low purity alarms to compressor overheating—and show you exactly how to identify and resolve each one. Whether you’re a plant engineer, service technician, or equipment owner, this guide will help you take control of your system’s reliability and reduce downtime with confidence.
1.Understanding How PSA Oxygen Generators Work
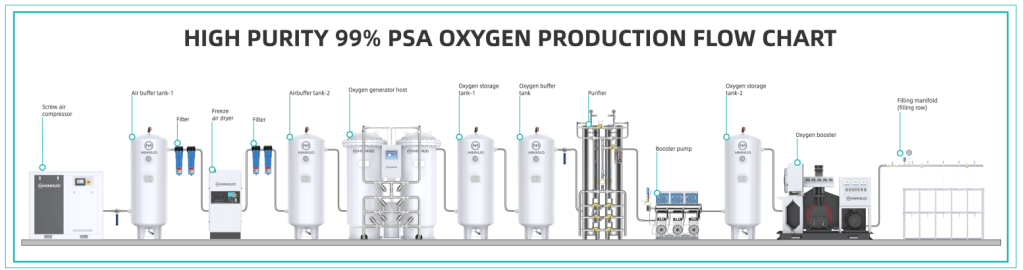
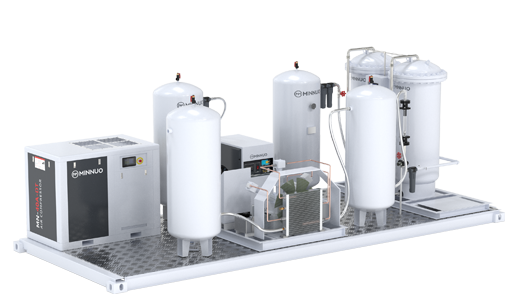
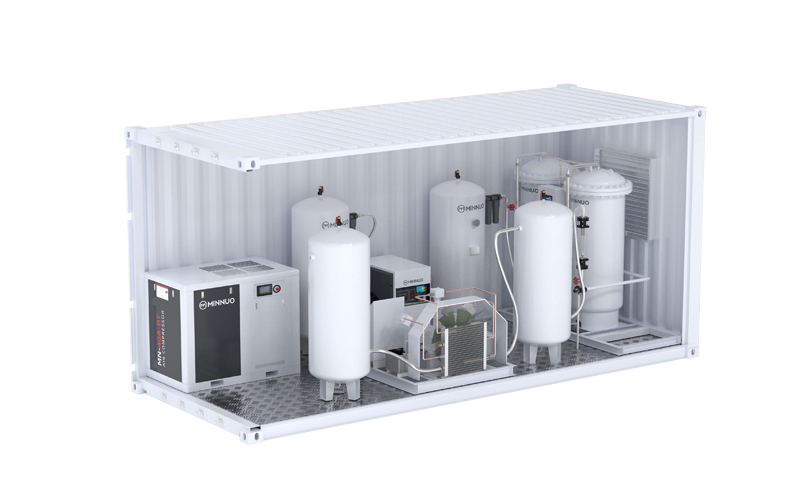
Before troubleshooting any oxygen generator, it’s essential to understand how a PSA (Pressure Swing Adsorption) system operates. Here’s a simplified breakdown of its core components and the process flow:
Key Components and Their Functions
| Component | Function |
| Air Compressor | Compresses atmospheric air (21% O₂, 78% N₂) to required pressure levels (typically 7–10 bar) |
| Pre-treatment Unit | Includes filters and an air dryer to remove moisture, dust, and oil—ensuring clean air for adsorption |
| PSA Module | Twin-tower system filled with molecular sieves (e.g., zeolite) that adsorb nitrogen, allowing oxygen to pass through |
| Oxygen Buffer Tank | Temporarily stores the produced oxygen to stabilize flow and ensure pressure consistency during peak usage |
| Control System (PLC + Sensors) | Automates valve switching, monitors purity/pressure, and handles alarm reporting or remote diagnostics |
How the PSA Process Works (Cycle Logic)
Step 1: Air in → compressed and cleaned
Step 2: Nitrogen molecules adsorbed by sieve (Tower A)
Step 3: Oxygen molecules pass through → collected in buffer tank
Step 4: Tower B regenerates (depressurizes & purges)
Step 5: Towers switch automatically every 45–60 seconds
→ Result: Continuous, uninterrupted flow of ~93% pure oxygen
Cycle Time: 40–60 seconds per tower
O₂ Purity Range: 90%–95% (typical for PSA)
Why This Matters for Troubleshooting
Moisture control is critical—wet air can destroy molecular sieves
Compressor health affects system pressure and airflow volume
Valve timing errors can lead to purity drops or high-pressure faults
Sensor data provides real-time visibility into flow, pressure, and purity
Understanding these basics helps operators quickly identify where a fault originates: is it the air input, the adsorption stage, or the oxygen delivery line?
Visual Schematic
[ Ambient Air ]
↓ [ Air Compressor ]
↓ [ Pre-Filters + Dryer ]
↓ [ PSA Towers (A/B) ] ←→ (Auto Switch)
↓ [ Buffer Tank ]
↓ [ Oxygen to Machines or Storage ]
Tip: Always start diagnosis by confirming air quality at the compressor outlet. Most PSA issues begin with poor input, not the PSA tower itself.
2.Common Problems and How to Fix Them
2.1 Low Oxygen Purity (Below 90%)
Low oxygen purity is one of the most common—and most feared—issues faced by PSA oxygen generator users. It directly affects cutting quality, weld penetration, and in medical settings, even patient safety.
Common Causes
| Cause | Description | Impact |
| Contaminated or Saturated Molecular Sieves | Moisture or oil blocks adsorption sites | Can no longer separate nitrogen effectively |
| Leaks in Valves or Pipework | Micro-leaks pull in ambient air or vent oxygen-rich gas | Oxygen concentration drops rapidly |
| Inadequate Air Drying | Water vapor bypasses dryer or filters | Moisture damages the zeolite beds |
| Flow Overload | Oxygen demand exceeds design rating | Purity drops as towers switch too quickly |
Pro Tip: Use a handheld oxygen analyzer to verify if purity drop is system-wide or at a specific outlet.
Solutions That Work
1. Replace or Reactivate Molecular Sieves
If the system has run 8,000+ hours or absorbed moisture, sieves lose efficiency
Some systems allow hot air reactivation; others need complete replacement
2. Leak Test the Pipework and Valves
Use soapy water or ultrasonic leak detector
Focus on solenoid valves, buffer tank joints, and PSA tower base fittings
3. Check Dryer Function and Filter Saturation
Look for clogged coalescing filters or saturated desiccant
Drain automatic water traps and confirm regeneration cycle is working
4. Reduce Output Load Temporarily
If multiple machines are running at peak load, purity can dip
Try isolating 1–2 branches and rechecking oxygen levels
5. Monitor Inlet Dew Point in Real-Time
Install a dew point sensor upstream of the PSA module
This prevents moisture from ever reaching the sieve beds
Diagnostic Flow Chart (Text Version)
↓ Oxygen Purity Drops < 90%
└── Check Analyzer → Confirm actual purity
├── If purity sensor fault → Calibrate or replace sensor
└── If actual purity low:
├─ Check compressor air quality (dew point)
├─ Inspect filters and dryer function
├─ Check tower temperature & pressure
└─ Run leak test across all pipelines
Real Case Snapshot
Issue: A client reported 88% purity after 2 years of use.
Diagnosis: Found blocked air dryer and cracked solenoid valve gasket.
Fix: Replaced filter element + tightened valve. Purity restored to 93% in under 3 hours.
Takeaway:
Most oxygen purity issues stem from air quality neglect or small unnoticed leaks. With regular preventive maintenance and simple sensors, 90%+ of purity issues can be avoided or fixed without external support.
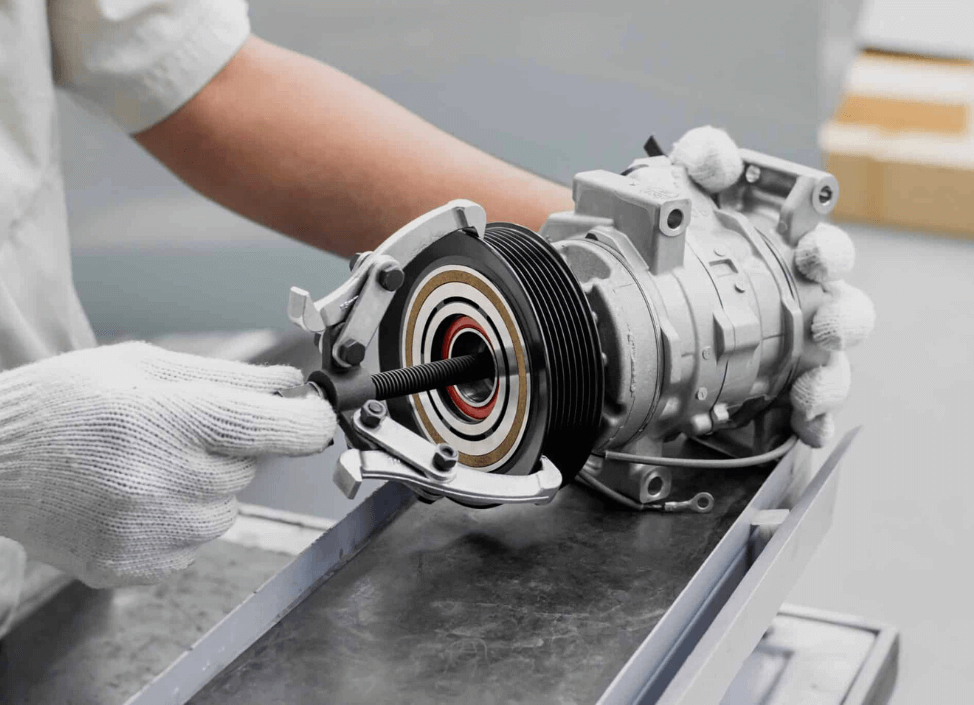
2.2 Compressor Overheating or Tripping
Compressor overheating is a leading cause of unplanned oxygen generator shutdowns. It affects both PSA efficiency and component life. Most cases stem from poor ventilation, inadequate maintenance, or incorrect operating parameters.
Typical Causes & Diagnostic Tips
| Cause | Description | Symptoms |
| High Ambient Temperature | Insufficient heat dissipation in machine room | Cabinet too hot to touch; thermal overload trips |
| Clogged Air Filters or Oil Separator | Restricts airflow, increases compression resistance | Rising discharge pressure; frequent restarts |
| Wrong or Overfilled Oil | Incorrect viscosity or too much oil affects cooling | Oil leaks; burnt smell; erratic pressure spikes |
| Overloading / Duty Cycle Violation | Non-industrial compressors run continuously | Cuts off after 10–20 mins; fails to restart until cooled |
Note: Many piston compressors are only rated for 60–75% duty cycle. Continuous operation without rest will inevitably cause trips.
Solutions to Restore Safe Operation
1. Improve Ventilation and Heat Dissipation
Maintain ≥1m clearance around compressor
Install exhaust fans if room temp exceeds 35°C
Avoid placing near heat-generating machines
2. Clean or Replace Intake Filters Regularly
Dirty filters reduce intake airflow and increase internal temperature
Use OEM-specified filters; replace every 2,000–3,000 hours
3. Use Correct Compressor Oil in Right Quantity
Use only recommended viscosity class (e.g. ISO VG-46 for screw units)
Never fill oil past the sight glass center mark
4. Observe Rated Duty Cycle
Allow cooldown pauses between long runs
Upgrade to 100% duty-rated screw compressor if needed
Preventive Maintenance Tip:
Log oil changes, filter replacements, and peak operating temperature weekly. Sudden heat surges are early signs of internal stress.
Quick Reference – Compressor Troubleshooting Chart
| Symptom | Probable Cause | Action |
| Auto shut-off after 15 mins | Overheating or poor ventilation | Improve airflow; rest intervals |
| Oil leaking from housing | Overfill or wrong oil type | Drain excess; flush & refill |
| Noisy startup with high vibration | Dirty filters or piston wear | Clean filters; inspect internals |
| Compressor hot to touch | High room temp or blocked fan | Add cooling fan; check for lint/dust |
2.3 Water or Oil in the Oxygen Output
Water vapor or oil mist in the oxygen outlet line is more than just a quality concern—it can cause cutting head damage, oxidized welds, and contaminate oxygen delivery in medical systems. If you notice condensation, wet piping, or a burnt-oil smell in the output, act immediately.
Root Causes
| Problem Source | Description | Consequences |
| Pre-treatment Failure | Faulty dryer or coalescing filter lets moisture pass into PSA system | Damages molecular sieve, lowers purity |
| Compressor Oil Carry-Over | Oil droplets escape separator in piston compressors | Oil appears in oxygen line or valves |
| Tank Drainage Failure | Manual drain not operated, or auto-drain stuck | Water accumulates, mixes with oxygen flow |
Indicator Signs:
Oil film on flowmeter glass
Water dripping from pipeline joints
Foggy or emulsified oxygen stream
Alarms from downstream laser or ozone systems
Solutions & Technical Fixes
✅ 1. Inspect and Replace Pre-Treatment Filters
Clean/replace coalescing elements (0.01 micron rating)
Confirm dew point < –40°C at PSA inlet
Check auto-drain valve functionality (manual test recommended weekly)
✅ 2. Address Compressor Oil Carry-Over
Drain and inspect oil separator regularly
If piston compressor → switch to oil-free or add inline oil mist eliminator
Use only ISO-standard lubricants for compressor grade applications
✅ 3. Improve Drain Management on Tanks
Drain buffer tanks manually every 1–2 days (if manual type)
Install timer-controlled auto-drain valves for reliability
Place a sight-glass on drainage outlet for visual inspection
✅ 4. Upgrade to Oil-Free Screw Compressor (for Clean Applications)
Medical, laser, ozone, and lab systems benefit greatly
Oil-free systems eliminate compressor-side contamination risk
Less maintenance, longer PSA service life, more stable purity
Maintenance Snapshot: Recommended Intervals
| Component | Action | Interval |
| Coalescing Filter | Replace | Every 4000–6000 hrs |
| Desiccant Dryer Cartridge | Replace or regenerate | Every 8000 hrs or 12 months |
| Oil Separator | Inspect & replace if saturated | Every 4000 hrs |
| Auto-Drain | Test manually | Weekly |
| Manual Drain | Operate if needed | Daily |
2.4 Alarm: High Pressure / Low Pressure in Buffer Tank
Buffer tank pressure alarms are often misunderstood but critically important. Left unresolved, they can shut down the entire oxygen system, cause overloading in compressors, or trigger frequent PSA tower switching—shortening component life.
Alarm Type Quick Guide
| Alarm Type | Likely Cause | Immediate Effect |
| High Pressure Alarm | Pressure switch stuck closed, blocked outlet, or valve not opening | System cannot release oxygen → PSA shutdown risk |
| Low Pressure Alarm | Solenoid valve stuck open, leak in piping, or underproduction | Insufficient oxygen supply to downstream machines |
Root Causes and Fault Indicators
Malfunctioning Pressure Switch
Contacts stuck, slow response, or out-of-range calibration
May cause false alarms or failure to trigger emergency venting
Incorrect System Calibration
PLC setpoints don’t match tank capacity or working pressure range
Alarm trips too early or not at all
Blocked Output or Solenoid Valve Failure
Dirt buildup, internal spring failure, or control signal not received
Oxygen backs up or leaks uncontrollably into distribution line
Tip: Use a digital pressure gauge with data logging to monitor patterns over 24 hours—can reveal fluctuation trends and false trigger zones.
Practical Solutions and Fix Strategies
✅ 1. Check and Calibrate Pressure Switch
Verify switch is not stuck or moisture-contaminated
Recalibrate or replace with pressure range–matched model
Clean terminals and check for corrosion
✅ 2. Clear Blocked Flow Paths
Inspect piping from buffer tank outlet to flow meters
Look for dents, misaligned gaskets, or foreign object blockage
Use manual vent valve to release excess pressure temporarily
✅ 3. Test Solenoid Valves Under Command
Use manual override or software test command to confirm valve opens/closes
If non-responsive: check wiring, PLC output, or replace the coil
Flush valve body if internal clogging is suspected
✅ 4. Review System Pressure Settings
Match PSA generator output with buffer tank working pressure
Ensure relief valves (if any) are not causing early release
Add a secondary regulator for sensitive applications (e.g. laser cutters)
2.5 System Fails to Start / Control Panel Not Responding
When the oxygen system won’t power up or the touchscreen becomes unresponsive, the issue could lie in power supply, control logic, or HMI hardware. These failures usually prevent any oxygen production and should be treated with caution to avoid electrical damage or unsafe restarts.
Common Causes & How to Identify Them
| Cause | Diagnostic Indicator | Risk Level |
| Power failure or unstable voltage | Total blackout, no light or screen | Medium |
| Blown fuse or tripped breaker | Audible “click” or warm breaker housing | Medium |
| Control board / PLC error | Boot sequence stuck or HMI not displaying | High |
| Touchscreen failure (HMI) | System running but no screen interaction | Medium–High |
Quick test: If internal fans or compressor hums are audible but touchscreen is off → likely HMI power fault. If all components are silent → start from main power inspection.
Effective Troubleshooting Steps
✅ 1. Check Incoming Power & Voltage Stability
Use a multimeter to verify line voltage (typically 220V/380V)
Install a UPS or AVR to stabilize voltage fluctuations, especially in rural or factory zones
✅ 2. Inspect Fuses and Circuit Breakers
Reset tripped breakers; replace blown fuses with matching amperage
Inspect wiring for short circuits or loose terminals before re-energizing
✅ 3. Reboot or Replace Touchscreen / HMI Panel
Try soft reset (press + hold power button, if applicable)
If screen frozen but backlight visible → replace HMI or SD card
Contact vendor if HMI uses proprietary software or locked firmware
✅ 4. PLC / Mainboard Repair or Swap
Check for LED status indicators on PLC (e.g., red = error, green = run)
Use factory tool software (e.g., Siemens TIA, Delta ISPSoft) to check logs
Replace only with model-matched firmware-compatible unit
⚠️ Safety Reminder: Before Any Internal Work
Always power off and unplug main supply before opening cabinet
Use lockout-tagout (LOTO) procedures if working in multi-operator sites
Discharge capacitors where applicable to avoid shock from stored energy
3.Preventive Maintenance Best Practices
A well-maintained oxygen generator runs more efficiently, produces purer oxygen, and is less likely to fail unexpectedly. The goal of preventive maintenance isn’t just to avoid problems—it’s to maximize uptime and extend component life.
Check system pressure & oxygen purity
Inspect control panel for alarms
Visually inspect for leaks, vibration, or noise
| Weekly |
Drain buffer tank (manual or verify auto-drain)
Check compressor oil level (if oil-based)
Confirm dryer and filter differential pressure readings
| Monthly |
Clean intake filters or prefilters
Test pressure switch and safety valve operation
Manually operate backup valve (if any)
| Annually |
Replace all filters (coalescing, carbon, particulate)
Replace or re-bake sieve beds (depending on hours & air quality)
Review and recalibrate control system and sensor probes
Flush piping if oil contamination occurred
Consumables to Watch (with Life Expectancy)
| Component | Typical Life (Hours) | Notes |
| Filters | 2000–4000 | Replace or clean per supplier spec |
| Valves | 10,000–20,000 | Look for response delay or leakage |
| Sieve Beds | 8,000–12,000 | Shorter in high-humidity or dusty environments |
| Lubricants (if applicable) | 2000–3000 | Use correct viscosity and grade only |
Tip: Keep 1 set of filters and a spare valve kit on-site to avoid delays when replacements are needed urgently.
Maintenance Logbook: What to Record
Oxygen purity readings
Flow rate (Nm³/h)
Compressor run time (daily + cumulative)
Drain frequency and condensate volume
Error code history
Date of last part replacement or repair
Digital logbook apps or Excel templates work well for medium-sized operations.
When to Call the OEM or Supplier
Purity drops below 85% for more than 4 hours
Pressure fluctuates ±20% from normal for unknown reasons
System fails to reboot after alarm reset
PLC or touchscreen becomes non-responsive
Oil or water repeatedly detected in oxygen output after filter replacement
You need certified parts for CE/ISO-compliant installations
✅ Takeaway:
Preventive maintenance isn’t just a checklist—it’s your defense against emergency downtime, costly part failures, and production loss. Just like oxygen, consistency is key.
4.When to Replace Instead of Repair
Not all oxygen generator failures are worth fixing—especially if your system is old, inefficient, or requires increasingly expensive spare parts. Below are clear, experience-based signals that your system may be better off replaced rather than repaired.
Technical & Financial Red Flags
| Criteria | What It Means | Why It Matters |
| Repair Cost > 50% of New Unit | Quotation for repairs + labor exceeds half the cost of a replacement PSA system | Industry rule-of-thumb: if the fix is >50%, it’s better to reinvest |
| Obsolete Electronics or Valves | HMI, PLC, or solenoid valves are no longer available or unsupported by OEM | Replacement delays, lack of firmware updates, low reliability |
| Excessive Run Hours | PSA towers ≥30,000 hrs; compressors ≥20,000 hrs without overhaul | High chance of internal fatigue, purity drops, unstable switching |
| Breakdowns Becoming Frequent | ≥3 service calls per quarter for same issues | Indicates deeper systemic degradation (e.g., internal rust, insulation breakdown) |
ROI Insight: Why Replacement May Be Cheaper Than Repair
Modern PSA oxygen generators:
Are 30–50% more energy efficient
Support remote monitoring, reducing maintenance labor
Use modular filters, valves, and sensors—lower spare part cost
Have improved molecular sieve formulation = longer lifespan
Come with better warranty & support (3–5 years in many regions)
ROI Example:
Replacing a 10-year-old 30Nm³/h system can save ~20% in electricity and reduce unplanned downtime by over 70%, achieving full payback in under 18 months.
Real-World Scenario
Before:
Client in Egypt had a 2009-built PSA system with weekly flow instability, repeated HMI blackouts, and oxygen purity fluctuating between 83%–88%.
After:
Replaced with a 60Nm³/h double-tower PSA system + touchscreen PLC + oil-free compressor.
Result:
Purity stabilized at 93%±1%
Zero shutdowns for 8 months
Maintenance hours reduced by 65%
Decision Checklist: Repair or Replace?
Has your unit been in use >10 years with no major overhauls?
Are spare parts taking >2 weeks to arrive or no longer available?
Are you experiencing more than 2 unplanned shutdowns/month?
Has energy consumption per Nm³ output increased noticeably?
If you answered “yes” to 2 or more, it may be time to upgrade.
Conclusion
Most oxygen generator failures aren’t catastrophic—they’re preventable, diagnosable, and often easily resolved with the right know-how. From low purity issues to compressor faults and sensor alarms, understanding the root causes and proper fixes empowers users to take control of their systems, rather than depend solely on reactive repairs.
By following structured preventive maintenance, recognizing warning signs early, and knowing when to repair and when to replace, operators can significantly reduce downtime, extend equipment life, and maintain optimal oxygen quality.
At MINNUO, we’re committed not just to manufacturing PSA oxygen systems—but to ensuring they run reliably for years. Our team provides comprehensive technical support, multilingual training guides, and remote diagnostics to help you solve problems fast. Whether you’re troubleshooting a pressure alarm or planning a system upgrade, we’re just one message away.
Need support, spare parts, or guidance? Contact the MINNUO service team or visit minnuoagro.com to get expert help tailored to your system.


 sales2:+86 17506119168